> ## Documentation Index
> Fetch the complete documentation index at: https://help.kivaro.io/llms.txt
> Use this file to discover all available pages before exploring further.
# Shopify Flow Automation
> Automate shipping label generation with Shopify Flow actions to streamline your fulfillment process. Exclusively available to paid plan users only.
export const calendlyUrl = "https://calendly.com/kivaro-support/30min";
export const supportEmail = "support@kivaro.io";
export const appName = "AusPost MyPost Business";
## Overview
The **Generate Shipping Label** Shopify Flow action automates the purchase of Australia Post shipping labels when fulfillment orders are ready to fulfill. This feature is most helpful for automating your most frequent orders with best-selling items, eliminating repetitive manual work and allowing you to focus on growing your business while routine orders are automatically processed and shipped.
**Perfect for High-Volume Orders:** Set up workflows for your top products or standard order types that you process frequently. Let automation handle the repetitive label generation for your best-selling items while you focus on special cases, customer service, and business growth. Ideal for merchants processing many similar orders daily.
**Domestic Orders Only:** This Shopify Flow action is designed exclusively for domestic Australian orders. The feature only works for orders with delivery addresses in Australia (country = AU). International orders require different handling and should be processed manually or through other means. Always add a condition to your workflow to check that the delivery address country equals "AU" before processing.
Automatically purchase shipping labels when orders meet your criteria
Set up rules based on order attributes, products, or delivery methods
Reduce manual work and process orders faster
Minimize human error with automated fulfillment workflows
## How It Works
The Shopify Flow action triggers when a fulfillment order is ready to fulfill, automatically generating and purchasing Australia Post shipping labels based on your configured conditions. You can choose between Parcel Post or Express Post based on the delivery method selected by the customer.
**Accessing Your Labels:** Generated labels are available in the app's Transactions page where you can download or print them. Alternatively, you can add an optional email action to your Flow workflow to automatically send the label URL to a specified email address (e.g., your warehouse or fulfillment team), making it easy to print and ship without accessing the app.
### Workflow Overview
```mermaid theme={null}
flowchart TD
A[New Order Created] --> B{Order Ready to Fulfill?}
B -->|Yes| C[Shopify Flow Triggered]
B -->|No| Z[Wait for Fulfillment]
C --> D{Delivery Address
Country = AU?}
D -->|No| X[Skip: International Order
Process Manually]
D -->|Yes| E{Check Flow Conditions}
E -->|Product Name Matches?| F[Configure Flow Action]
E -->|Order Value Threshold?| F
E -->|Customer Location?| F
E -->|Delivery Method?| F
E -->|Other Custom Conditions?| F
F --> G[Flow Action Inputs:
• Fulfillment Order ID: fulfillmentOrder.id
• Postage Type: PARCELPOST or EXPRESSPOST
• Package Name: Optional
• Notify customer: true/false]
G --> H{Postage Type?}
H -->|EXPRESSPOST| I[Generate Express Post Label]
H -->|PARCELPOST| J[Generate Parcel Post Label]
I --> K[Purchase Label Automatically]
J --> K
K --> L[Label Applied to Order]
L --> M[Order Fulfilled]
M --> N{Notify customer
enabled?}
N -->|Yes| O[Send Tracking to Customer]
N -->|No| P[Skip Notification]
O --> Q{Optional: Email
Label URL?}
P --> Q
Q -->|Yes| R[Email Label URL
to Specified Address]
Q -->|No| S[Label Available in
Transactions Page]
R --> T[✅ Order Complete]
S --> T
X --> T
style A fill:#e1f5ff
style C fill:#fff4e1
style D fill:#ffcccc
style G fill:#fff9e6
style K fill:#e8f5e9
style Q fill:#ffe6f2
style R fill:#e1f5ff
style S fill:#e1f5ff
style X fill:#ffcccc
style T fill:#c8e6c9
```
## Prerequisites
Before setting up the Shopify Flow action, ensure you have:
1. **Paid Plan Subscription**: You must be on a paid plan for {appName}. Starter plan users must upgrade to use Flow actions.
2. **{appName} Installed**: The app must be installed and connected to your Australia Post MyPost Business account
3. **Active Australia Post Account**: Your Australia Post account must be connected with a valid payment method
**Plan Requirement:** You must be on a paid plan for {appName} to use Shopify Flow actions. Starter plan users must upgrade.
**Want to try this feature?** Upgrade to our paid plan which includes a 14-day trial period. This gives you full access to Shopify Flow automation and all premium features risk-free, so you can experience the time-saving benefits of automated label generation before committing.
## Setting Up Your First Flow
### Step 1: Access Shopify Flow
1. Navigate to **Settings** → **Apps and sales channels** in your Shopify admin
2. Click **Shopify Flow** (or install it from the Shopify App Store if not already installed)
3. Click **Create workflow** to start building your automation
### Step 2: Choose Your Trigger
You have two options for triggering your workflow:
**Option A: Real-Time Trigger (Recommended)**
1. Select **Fulfillment order** as your trigger type
2. Choose **Fulfillment order is ready to fulfill** as the specific trigger event
3. This ensures the flow runs immediately when orders are ready to be shipped
The "Fulfillment order is ready to fulfill" trigger is ideal because it ensures all order processing is complete before generating labels, including inventory allocation and payment confirmation.
**Option B: Scheduled Trigger (Batch Processing)**
1. Select **Schedule** as your trigger type
2. Choose **Run workflow daily** or **Run workflow weekly**
3. Set the specific time you want the workflow to run (e.g., 9:00 AM daily)
4. This allows you to process orders in batches at your preferred time
**Scheduled Workflows for Shipping Windows:** Use scheduled triggers to run your workflow every day at a specific time (such as your shipping cut-off time or during your shipping window). This is perfect for processing all orders from the previous day in one batch, ensuring labels are generated during your designated shipping hours. For example, set the workflow to run at 2:00 PM daily to process all orders placed before your same-day shipping cut-off.
### Step 3: Add Conditions
**Required Condition:** Always add a condition to check that the delivery address country equals "AU" (Australia). This ensures the workflow only processes domestic orders, as this feature is designed exclusively for Australian domestic shipping. International orders will be skipped and should be processed manually.
Add conditions to control when the action should run. You can create rules based on:
* **Delivery address country** (Required): Set condition "Delivery address country equals AU" to ensure only domestic Australian orders are processed
* **Product attributes**: Filter by product name, tags, or vendor
* **Order value**: Set minimum or maximum order value thresholds
* **Customer location**: Target specific states or regions within Australia
* **Delivery method**: Differentiate between standard and express shipping
* **Order tags**: Use custom tags to identify specific order types
* **Product tags**: Automate based on product categories or characteristics
**Example Conditions:**
Always include this condition to ensure only Australian domestic orders are processed:
* **Condition**: Delivery address country equals "AU"
* **Result**: Only orders with Australian delivery addresses will trigger label generation. International orders are skipped.
Create a condition that only processes orders containing specific products:
* **Condition**: Product name contains "Express"
* **Result**: Only orders with "Express" in the product name will trigger label generation
Automate high-value orders with special handling:
* **Condition**: Order total is greater than \$200
* **Result**: High-value orders automatically get Express Post labels
Differentiate shipping services based on customer selection:
* **Condition**: Delivery method equals "Express Shipping"
* **Result**: Express Post labels for express orders, Parcel Post for standard
### Step 4: Add the Generate Shipping Label Action
1. Click **Add action** in your workflow
2. Search for and select **Generate Shipping Label** (from {appName})
3. Configure the action settings with the following fields:
**Required Fields:**
* **Fulfillment Order ID**: Enter `{{ fulfillmentOrder.id }}` to use the fulfillment order ID from the trigger. This is automatically populated from the workflow trigger.
* **Postage Type**: Enter either `PARCELPOST` or `EXPRESSPOST` (must be uppercase).
* Use `PARCELPOST` for standard shipping
* Use `EXPRESSPOST` for express/priority shipping
* You can use dynamic values like `{{ order.shipping_method.title }}` to automatically select based on the delivery method
**Optional Fields:**
* **Package Name**: Enter the name of an Australia Post Flat Rate Package or Custom Package (e.g., "Extra Small Satchel", "Extra Small Box", "Custom Box").
* **Important:** The package name must match exactly as configured in your app settings (case-sensitive, including spaces and capitalization)
* If not provided, the default package from your app settings will be used
* To find the exact package names, check your app's Settings → Packages section
* **Notify customer**: Toggle to send fulfillment notification to the customer (default: enabled). When enabled, customers will automatically receive tracking information.
You can use dynamic values from the order to automatically select the appropriate shipping service. For example, use a condition to check the delivery method, then set Postage Type to `EXPRESSPOST` for express orders and `PARCELPOST` for standard orders.
**Package Name Must Match Exactly:** When specifying a Package Name, it must match exactly as it appears in your app settings. The name is case-sensitive and must include the exact capitalization, spaces, and spelling. For example, if your custom package is named "Large Box" in settings, use exactly "Large Box" (not "large box" or "LargeBox"). Check your app's package settings to get the exact name.
If you don't specify a Package Name, the app will use your default package setting from your app configuration.
### Step 5: Access Your Generated Labels (Optional)
After labels are generated, you have two ways to access and print them:
**Option A: Download from Transactions Page**
1. Navigate to the {appName} app in your Shopify admin
2. Go to the **Transactions** page
3. Find the generated label and click to download or print
4. This is useful for batch printing multiple labels at once
**Option B: Email Label URL via Shopify Flow (Optional)**
Add an additional step to your workflow to automatically email the label URL:
1. After the "Generate Shipping Label" action, click **Add action**
2. Select **Send email** action
3. Configure the email to send the label URL to your specified email address (e.g., [warehouse@yourstore.com](mailto:warehouse@yourstore.com), [fulfillment@yourstore.com](mailto:fulfillment@yourstore.com))
4. Use the label URL from the previous action's output
5. This allows you to receive label links directly in your inbox for easy printing
**Email Workflow for Printing:** Set up an email action in your Flow to send label URLs to your warehouse or fulfillment team's email address. This way, labels are automatically emailed when generated, making it easy to print and ship without accessing the app. Perfect for teams that need labels sent to a specific printer or location.
### Step 6: Test and Activate
1. **Test your workflow** with a test order to ensure it works as expected
2. **Review the conditions** to make sure they match your business needs
3. **Activate the workflow** when you're ready to automate label generation
Always test new workflows with a small number of orders before enabling them for all orders. Monitor the first few automated labels to ensure they're generated correctly.
### Sample Workflow Example
Here's what a complete Shopify Flow workflow looks like in the Shopify Flow interface:
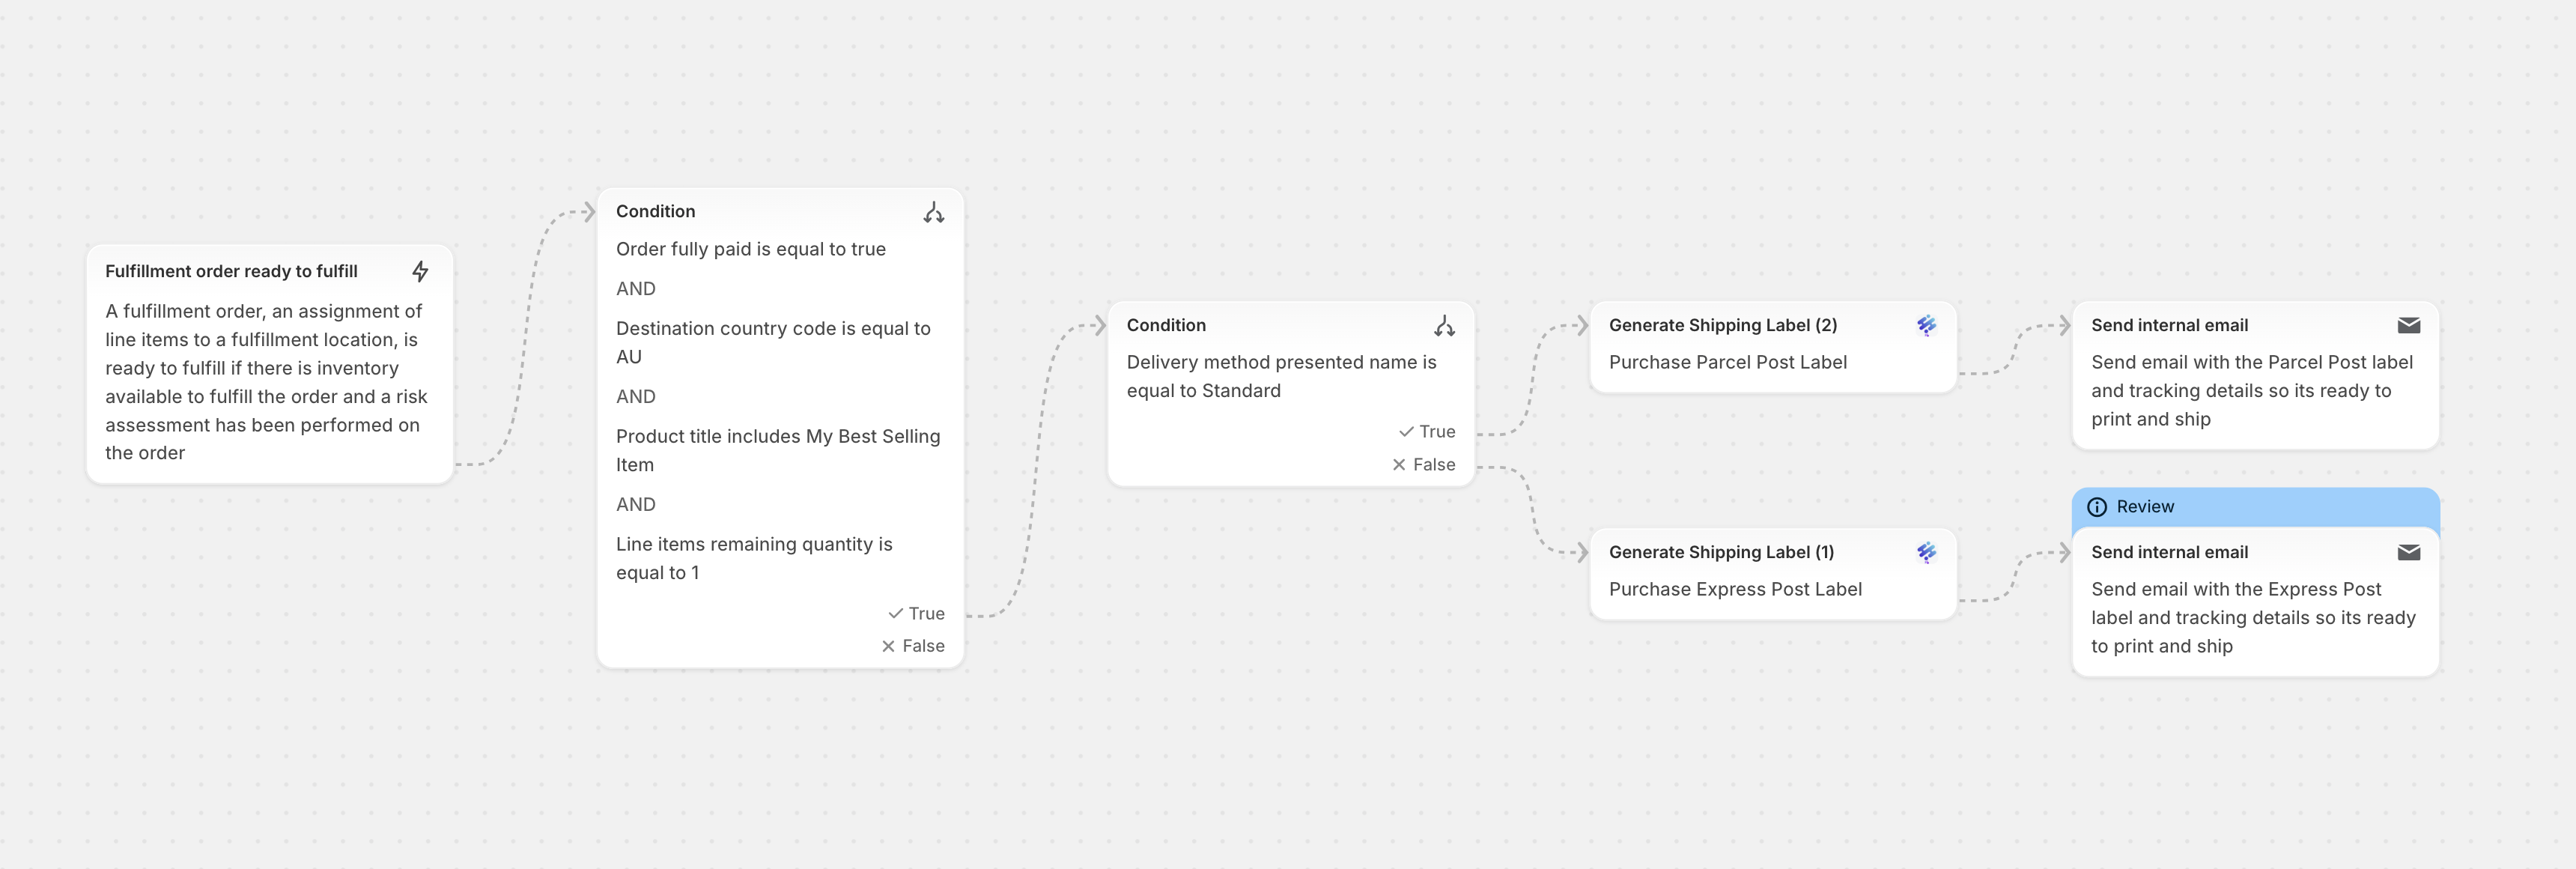 This example workflow demonstrates:
* **Trigger**: Fulfillment order is ready to fulfill
* **Condition**: Delivery address country equals "AU" (ensuring only domestic orders are processed)
* **Action**: Generate Shipping Label with Postage Type set to PARCELPOST
* All required fields properly configured with the fulfillment order ID from the trigger
Use this as a reference when setting up your own workflows. The workflow shown processes all domestic Australian orders automatically with Parcel Post service.
## Common Use Cases
### Use Case 1: Automate Standard Orders
**Scenario**: Automatically process all standard domestic orders with Parcel Post.
**Setup**:
* **Trigger**: Fulfillment order is ready to fulfill
* **Condition**: Delivery address country equals "AU" (required for domestic orders only)
* **Action**: Generate Shipping Label
* Fulfillment Order ID: `{{ fulfillmentOrder.id }}`
* Postage Type: `PARCELPOST`
* Package Name: (leave empty to use default)
* Notify customer: Enabled
**Benefit**: Eliminates manual label creation for routine orders, saving hours each week.
### Use Case 2: Express Orders Get Express Post
**Scenario**: Automatically upgrade to Express Post when customers select express shipping.
**Setup**:
* **Trigger**: Fulfillment order is ready to fulfill
* **Condition**:
* Delivery address country equals "AU" (required)
* AND Delivery method contains "Express" OR Shipping method equals "Express Shipping"
* **Action**: Generate Shipping Label
* Fulfillment Order ID: `{{ fulfillmentOrder.id }}`
* Postage Type: `EXPRESSPOST`
* Package Name: (leave empty to use default)
* Notify customer: Enabled
**Benefit**: Ensures customers receive the service they paid for without manual intervention.
### Use Case 3: High-Value Items with Express Post
**Scenario**: Automatically use Express Post for orders over \$200.
**Setup**:
* **Trigger**: Fulfillment order is ready to fulfill
* **Condition**:
* Delivery address country equals "AU" (required)
* AND Order total is greater than or equal to \$200
* **Action**: Generate Shipping Label
* Fulfillment Order ID: `{{ fulfillmentOrder.id }}`
* Postage Type: `EXPRESSPOST`
* Package Name: (leave empty to use default package)
* Notify customer: Enabled
**Benefit**: Protects valuable shipments automatically with Express Post service.
### Use Case 4: Product-Specific Automation
**Scenario**: Process specific product categories with different shipping services.
**Setup**:
* **Trigger**: Fulfillment order is ready to fulfill
* **Condition**:
* Delivery address country equals "AU" (required)
* AND Product name contains "Fragile" OR Product tag equals "Express-Only"
* **Action**: Generate Shipping Label
* Fulfillment Order ID: `{{ fulfillmentOrder.id }}`
* Postage Type: `EXPRESSPOST`
* Package Name: (leave empty or specify "Extra Small Satchel" for small fragile items)
* Notify customer: Enabled
**Benefit**: Ensures fragile or time-sensitive items get priority handling automatically.
### Use Case 5: Regional Shipping Rules
**Scenario**: Automatically use Express Post for remote locations.
**Setup**:
* **Trigger**: Fulfillment order is ready to fulfill
* **Condition**:
* Delivery address country equals "AU" (required)
* AND Customer state equals "WA" OR Customer state equals "NT"
* **Action**: Generate Shipping Label
* Fulfillment Order ID: `{{ fulfillmentOrder.id }}`
* Postage Type: `EXPRESSPOST`
* Package Name: (leave empty to use default)
* Notify customer: Enabled
**Benefit**: Maintains delivery times for remote locations without manual review.
### Use Case 6: Scheduled Batch Processing
**Scenario**: Process all orders from the previous day during your shipping window or at your shipping cut-off time.
**Setup**:
* **Trigger**: Schedule - Run workflow daily at a specific time (e.g., 2:00 PM)
* **Condition**:
* Delivery address country equals "AU" (required)
* AND Order created date is before today OR Order is ready to fulfill
* **Action**: Generate Shipping Label
* Fulfillment Order ID: `{{ fulfillmentOrder.id }}`
* Postage Type: `PARCELPOST` (or use conditions to determine based on delivery method)
* Package Name: (leave empty to use default)
* Notify customer: Enabled
**Benefit**: Process all orders in one batch during your designated shipping hours. Perfect for merchants with specific shipping cut-off times who want to generate labels for all previous day's orders at once, ensuring efficient batch processing and alignment with your shipping schedule.
## Workflow Examples
### Example 1: Simple Automation
**Workflow Name**: "Auto-Generate Labels for Standard Orders"
```
Trigger: Fulfillment order is ready to fulfill
Condition: Delivery address country equals "AU"
Action: Generate Shipping Label
- Fulfillment Order ID: {{ fulfillmentOrder.id }}
- Postage Type: PARCELPOST
- Package Name: (leave empty to use default)
- Notify customer: Enabled
```
**Result**: All orders automatically get Parcel Post labels generated and purchased using your default package settings.
### Example 2: Conditional Automation
**Workflow Name**: "Express Orders - Express Post"
```
Trigger: Fulfillment order is ready to fulfill
Conditions:
- Delivery address country equals "AU"
- AND Delivery method contains "Express"
Action: Generate Shipping Label
- Fulfillment Order ID: {{ fulfillmentOrder.id }}
- Postage Type: EXPRESSPOST
- Package Name: (leave empty to use default)
- Notify customer: Enabled
```
**Result**: Orders with express shipping automatically get Express Post labels with default package selection.
### Example 3: Custom Package Selection
**Workflow Name**: "Heavy Items - Large Box"
```
Trigger: Fulfillment order is ready to fulfill
Conditions:
- Delivery address country equals "AU"
- AND Order weight is greater than 5kg
Action: Generate Shipping Label
- Fulfillment Order ID: {{ fulfillmentOrder.id }}
- Postage Type: PARCELPOST
- Package Name: Large Box
- Notify customer: Enabled
```
**Result**: Heavy orders automatically get Parcel Post labels with Large Box packaging.
### Example 4: Multi-Condition Workflow
**Workflow Name**: "High-Value Express Handling"
```
Trigger: Fulfillment order is ready to fulfill
Conditions:
- Delivery address country equals "AU"
- AND Order total is greater than $200
- AND Delivery method contains "Express"
Action: Generate Shipping Label
- Fulfillment Order ID: {{ fulfillmentOrder.id }}
- Postage Type: EXPRESSPOST
- Package Name: (leave empty to use default package)
- Notify customer: Enabled
```
**Result**: High-value express orders get Express Post labels with default package selection.
### Example 5: Scheduled Batch Processing
**Workflow Name**: "Daily Shipping Cut-Off Processing"
```
Trigger: Schedule - Run workflow daily at 2:00 PM
Conditions:
- Delivery address country equals "AU"
- AND Fulfillment order is ready to fulfill
Action: Generate Shipping Label
- Fulfillment Order ID: {{ fulfillmentOrder.id }}
- Postage Type: PARCELPOST
- Package Name: (leave empty to use default)
- Notify customer: Enabled
```
**Result**: All ready-to-fulfill orders are processed in a batch at your shipping cut-off time (2:00 PM), generating labels for all orders from the previous day or before the cut-off. Perfect for aligning label generation with your shipping schedule.
## Benefits of Automation
### Time Savings
* **Before**: Manually create labels for each order (2-3 minutes per order)
* **After**: Labels generated automatically (0 minutes of your time)
* **Savings**: For 50 orders/day, save 2-3 hours daily
### Error Reduction
* Eliminates manual data entry errors
* Ensures consistent label generation
* Reduces missed shipments
* Maintains accurate tracking information
### Scalability
* Handle order volume spikes without additional staff
* Process orders 24/7 without manual intervention
* Scale your business without proportional fulfillment overhead
### Customer Experience
* Faster order processing and shipping
* Consistent delivery times
* Automatic tracking updates
* Reduced fulfillment delays
## Best Practices
### Start Simple
1. Begin with a simple workflow (no conditions or basic conditions)
2. Test with a few orders
3. Gradually add more complex conditions as needed
### Use Conditions Wisely
* **Too broad**: Processing all orders might include test orders or orders that need special handling
* **Too narrow**: Overly specific conditions might miss orders that should be automated
* **Just right**: Balance automation with control
### Monitor Regularly
* Review automated labels weekly
* Check for any errors or unexpected behavior
* Adjust conditions based on real-world performance
## Troubleshooting
### Flow Not Triggering
Ensure your workflow is **Active** and not paused. Check the workflow status in Shopify Flow.
Confirm that orders are actually reaching "ready to fulfill" status. Some orders might be on hold or have payment issues.
Test if your conditions are too restrictive. Try removing conditions temporarily to see if the flow triggers.
### Labels Not Generating
Verify that {appName} is properly installed and connected to your Australia Post account. Check for any connection errors in the app.
Ensure your Australia Post account has a valid payment method and sufficient credit. Labels cannot be purchased without payment authorization.
Check that both the fulfillment location address and customer delivery address are complete and valid. Incomplete addresses will prevent label generation.
Verify the order is in the correct state. Orders that are already fulfilled, cancelled, or on hold won't trigger label generation.
### Wrong Shipping Service Selected
* **Issue**: Parcel Post used instead of Express Post (or vice versa)
* **Solution**: Review your action configuration and ensure the **Postage Type** field is set correctly:
* Must be exactly `PARCELPOST` or `EXPRESSPOST` (uppercase, no spaces)
* Check that your conditions are correctly identifying express vs. standard orders
### Package Name Not Working
* **Issue**: Label generation fails or wrong package is selected when specifying a Package Name
* **Solution**: Verify the **Package Name** matches exactly as configured in your app settings:
* Package names are case-sensitive (e.g., "Large Box" is different from "large box")
* Must include exact spacing and capitalization
* Check your app's Settings → Packages section to get the exact package name
* Common issues: extra spaces, wrong capitalization, or typos in the package name
* **Alternative**: Leave Package Name empty to use your default package setting
### Multiple Labels for Same Order
* **Issue**: Multiple labels generated for a single order
* **Solution**: Check if you have multiple active workflows that might be triggering for the same order
* **Prevention**: Use more specific conditions or disable duplicate workflows
## Advanced Configuration
### Dynamic Service Selection
Configure the action to automatically select shipping service based on the order's delivery method:
* **If** delivery method contains "Express" → Set Postage Type to `EXPRESSPOST`
* **Else** → Set Postage Type to `PARCELPOST`
You can use Shopify Flow conditions to check the delivery method, then set the Postage Type field accordingly. This ensures customers always get the service they selected.
**Example Setup:**
* Create two separate workflows with different conditions
* Workflow 1: Condition "Delivery method contains Express" → Postage Type: `EXPRESSPOST`
* Workflow 2: Condition "Delivery method does not contain Express" → Postage Type: `PARCELPOST`
### Conditional Actions
Create multiple workflows for different scenarios:
* **Workflow 1**: Standard orders → Postage Type: `PARCELPOST`
* **Workflow 2**: Express orders → Postage Type: `EXPRESSPOST`
* **Workflow 3**: High-value orders → Postage Type: `EXPRESSPOST`
* **Workflow 4**: Specific packages → Postage Type: `PARCELPOST` with Package Name: "Large Box"
Each workflow handles different order types automatically. Remember to use the exact field names:
* **Fulfillment Order ID**: Always use `{{ fulfillmentOrder.id }}`
* **Postage Type**: Must be `PARCELPOST` or `EXPRESSPOST` (uppercase)
* **Package Name**: Optional, leave empty to use default package from app settings. **Important:** If specified, must match exactly as configured in your app settings (case-sensitive)
## Limitations and Considerations
### Plan Requirements
* You must be on a paid plan for {appName} to use Shopify Flow actions
* Starter plan users must upgrade to a paid plan to use Flow actions
* Consider the cost-benefit of upgrading vs. manual processing
### Order Processing
* Flow actions run when fulfillment orders are ready, which may be after payment processing
* Some orders might need manual review (fraud checks, special instructions, etc.)
* Consider excluding certain order types from automation
### Error Handling
* If label generation fails, the order won't be automatically fulfilled
* Monitor failed label generations and address issues promptly
* Set up notifications for workflow failures
## Next Steps
Now that you understand Shopify Flow automation, explore these related features:
Automate package selection and shipping options based on order conditions.
Process multiple orders manually when needed for special cases.
Learn about all features and advanced configuration options.
Get up and running quickly with basic setup instructions.
**Need help setting up your Flow?** Contact our support team or book a free consultation to get expert guidance on automating your fulfillment process.
This example workflow demonstrates:
* **Trigger**: Fulfillment order is ready to fulfill
* **Condition**: Delivery address country equals "AU" (ensuring only domestic orders are processed)
* **Action**: Generate Shipping Label with Postage Type set to PARCELPOST
* All required fields properly configured with the fulfillment order ID from the trigger
Use this as a reference when setting up your own workflows. The workflow shown processes all domestic Australian orders automatically with Parcel Post service.
## Common Use Cases
### Use Case 1: Automate Standard Orders
**Scenario**: Automatically process all standard domestic orders with Parcel Post.
**Setup**:
* **Trigger**: Fulfillment order is ready to fulfill
* **Condition**: Delivery address country equals "AU" (required for domestic orders only)
* **Action**: Generate Shipping Label
* Fulfillment Order ID: `{{ fulfillmentOrder.id }}`
* Postage Type: `PARCELPOST`
* Package Name: (leave empty to use default)
* Notify customer: Enabled
**Benefit**: Eliminates manual label creation for routine orders, saving hours each week.
### Use Case 2: Express Orders Get Express Post
**Scenario**: Automatically upgrade to Express Post when customers select express shipping.
**Setup**:
* **Trigger**: Fulfillment order is ready to fulfill
* **Condition**:
* Delivery address country equals "AU" (required)
* AND Delivery method contains "Express" OR Shipping method equals "Express Shipping"
* **Action**: Generate Shipping Label
* Fulfillment Order ID: `{{ fulfillmentOrder.id }}`
* Postage Type: `EXPRESSPOST`
* Package Name: (leave empty to use default)
* Notify customer: Enabled
**Benefit**: Ensures customers receive the service they paid for without manual intervention.
### Use Case 3: High-Value Items with Express Post
**Scenario**: Automatically use Express Post for orders over \$200.
**Setup**:
* **Trigger**: Fulfillment order is ready to fulfill
* **Condition**:
* Delivery address country equals "AU" (required)
* AND Order total is greater than or equal to \$200
* **Action**: Generate Shipping Label
* Fulfillment Order ID: `{{ fulfillmentOrder.id }}`
* Postage Type: `EXPRESSPOST`
* Package Name: (leave empty to use default package)
* Notify customer: Enabled
**Benefit**: Protects valuable shipments automatically with Express Post service.
### Use Case 4: Product-Specific Automation
**Scenario**: Process specific product categories with different shipping services.
**Setup**:
* **Trigger**: Fulfillment order is ready to fulfill
* **Condition**:
* Delivery address country equals "AU" (required)
* AND Product name contains "Fragile" OR Product tag equals "Express-Only"
* **Action**: Generate Shipping Label
* Fulfillment Order ID: `{{ fulfillmentOrder.id }}`
* Postage Type: `EXPRESSPOST`
* Package Name: (leave empty or specify "Extra Small Satchel" for small fragile items)
* Notify customer: Enabled
**Benefit**: Ensures fragile or time-sensitive items get priority handling automatically.
### Use Case 5: Regional Shipping Rules
**Scenario**: Automatically use Express Post for remote locations.
**Setup**:
* **Trigger**: Fulfillment order is ready to fulfill
* **Condition**:
* Delivery address country equals "AU" (required)
* AND Customer state equals "WA" OR Customer state equals "NT"
* **Action**: Generate Shipping Label
* Fulfillment Order ID: `{{ fulfillmentOrder.id }}`
* Postage Type: `EXPRESSPOST`
* Package Name: (leave empty to use default)
* Notify customer: Enabled
**Benefit**: Maintains delivery times for remote locations without manual review.
### Use Case 6: Scheduled Batch Processing
**Scenario**: Process all orders from the previous day during your shipping window or at your shipping cut-off time.
**Setup**:
* **Trigger**: Schedule - Run workflow daily at a specific time (e.g., 2:00 PM)
* **Condition**:
* Delivery address country equals "AU" (required)
* AND Order created date is before today OR Order is ready to fulfill
* **Action**: Generate Shipping Label
* Fulfillment Order ID: `{{ fulfillmentOrder.id }}`
* Postage Type: `PARCELPOST` (or use conditions to determine based on delivery method)
* Package Name: (leave empty to use default)
* Notify customer: Enabled
**Benefit**: Process all orders in one batch during your designated shipping hours. Perfect for merchants with specific shipping cut-off times who want to generate labels for all previous day's orders at once, ensuring efficient batch processing and alignment with your shipping schedule.
## Workflow Examples
### Example 1: Simple Automation
**Workflow Name**: "Auto-Generate Labels for Standard Orders"
```
Trigger: Fulfillment order is ready to fulfill
Condition: Delivery address country equals "AU"
Action: Generate Shipping Label
- Fulfillment Order ID: {{ fulfillmentOrder.id }}
- Postage Type: PARCELPOST
- Package Name: (leave empty to use default)
- Notify customer: Enabled
```
**Result**: All orders automatically get Parcel Post labels generated and purchased using your default package settings.
### Example 2: Conditional Automation
**Workflow Name**: "Express Orders - Express Post"
```
Trigger: Fulfillment order is ready to fulfill
Conditions:
- Delivery address country equals "AU"
- AND Delivery method contains "Express"
Action: Generate Shipping Label
- Fulfillment Order ID: {{ fulfillmentOrder.id }}
- Postage Type: EXPRESSPOST
- Package Name: (leave empty to use default)
- Notify customer: Enabled
```
**Result**: Orders with express shipping automatically get Express Post labels with default package selection.
### Example 3: Custom Package Selection
**Workflow Name**: "Heavy Items - Large Box"
```
Trigger: Fulfillment order is ready to fulfill
Conditions:
- Delivery address country equals "AU"
- AND Order weight is greater than 5kg
Action: Generate Shipping Label
- Fulfillment Order ID: {{ fulfillmentOrder.id }}
- Postage Type: PARCELPOST
- Package Name: Large Box
- Notify customer: Enabled
```
**Result**: Heavy orders automatically get Parcel Post labels with Large Box packaging.
### Example 4: Multi-Condition Workflow
**Workflow Name**: "High-Value Express Handling"
```
Trigger: Fulfillment order is ready to fulfill
Conditions:
- Delivery address country equals "AU"
- AND Order total is greater than $200
- AND Delivery method contains "Express"
Action: Generate Shipping Label
- Fulfillment Order ID: {{ fulfillmentOrder.id }}
- Postage Type: EXPRESSPOST
- Package Name: (leave empty to use default package)
- Notify customer: Enabled
```
**Result**: High-value express orders get Express Post labels with default package selection.
### Example 5: Scheduled Batch Processing
**Workflow Name**: "Daily Shipping Cut-Off Processing"
```
Trigger: Schedule - Run workflow daily at 2:00 PM
Conditions:
- Delivery address country equals "AU"
- AND Fulfillment order is ready to fulfill
Action: Generate Shipping Label
- Fulfillment Order ID: {{ fulfillmentOrder.id }}
- Postage Type: PARCELPOST
- Package Name: (leave empty to use default)
- Notify customer: Enabled
```
**Result**: All ready-to-fulfill orders are processed in a batch at your shipping cut-off time (2:00 PM), generating labels for all orders from the previous day or before the cut-off. Perfect for aligning label generation with your shipping schedule.
## Benefits of Automation
### Time Savings
* **Before**: Manually create labels for each order (2-3 minutes per order)
* **After**: Labels generated automatically (0 minutes of your time)
* **Savings**: For 50 orders/day, save 2-3 hours daily
### Error Reduction
* Eliminates manual data entry errors
* Ensures consistent label generation
* Reduces missed shipments
* Maintains accurate tracking information
### Scalability
* Handle order volume spikes without additional staff
* Process orders 24/7 without manual intervention
* Scale your business without proportional fulfillment overhead
### Customer Experience
* Faster order processing and shipping
* Consistent delivery times
* Automatic tracking updates
* Reduced fulfillment delays
## Best Practices
### Start Simple
1. Begin with a simple workflow (no conditions or basic conditions)
2. Test with a few orders
3. Gradually add more complex conditions as needed
### Use Conditions Wisely
* **Too broad**: Processing all orders might include test orders or orders that need special handling
* **Too narrow**: Overly specific conditions might miss orders that should be automated
* **Just right**: Balance automation with control
### Monitor Regularly
* Review automated labels weekly
* Check for any errors or unexpected behavior
* Adjust conditions based on real-world performance
## Troubleshooting
### Flow Not Triggering
Ensure your workflow is **Active** and not paused. Check the workflow status in Shopify Flow.
Confirm that orders are actually reaching "ready to fulfill" status. Some orders might be on hold or have payment issues.
Test if your conditions are too restrictive. Try removing conditions temporarily to see if the flow triggers.
### Labels Not Generating
Verify that {appName} is properly installed and connected to your Australia Post account. Check for any connection errors in the app.
Ensure your Australia Post account has a valid payment method and sufficient credit. Labels cannot be purchased without payment authorization.
Check that both the fulfillment location address and customer delivery address are complete and valid. Incomplete addresses will prevent label generation.
Verify the order is in the correct state. Orders that are already fulfilled, cancelled, or on hold won't trigger label generation.
### Wrong Shipping Service Selected
* **Issue**: Parcel Post used instead of Express Post (or vice versa)
* **Solution**: Review your action configuration and ensure the **Postage Type** field is set correctly:
* Must be exactly `PARCELPOST` or `EXPRESSPOST` (uppercase, no spaces)
* Check that your conditions are correctly identifying express vs. standard orders
### Package Name Not Working
* **Issue**: Label generation fails or wrong package is selected when specifying a Package Name
* **Solution**: Verify the **Package Name** matches exactly as configured in your app settings:
* Package names are case-sensitive (e.g., "Large Box" is different from "large box")
* Must include exact spacing and capitalization
* Check your app's Settings → Packages section to get the exact package name
* Common issues: extra spaces, wrong capitalization, or typos in the package name
* **Alternative**: Leave Package Name empty to use your default package setting
### Multiple Labels for Same Order
* **Issue**: Multiple labels generated for a single order
* **Solution**: Check if you have multiple active workflows that might be triggering for the same order
* **Prevention**: Use more specific conditions or disable duplicate workflows
## Advanced Configuration
### Dynamic Service Selection
Configure the action to automatically select shipping service based on the order's delivery method:
* **If** delivery method contains "Express" → Set Postage Type to `EXPRESSPOST`
* **Else** → Set Postage Type to `PARCELPOST`
You can use Shopify Flow conditions to check the delivery method, then set the Postage Type field accordingly. This ensures customers always get the service they selected.
**Example Setup:**
* Create two separate workflows with different conditions
* Workflow 1: Condition "Delivery method contains Express" → Postage Type: `EXPRESSPOST`
* Workflow 2: Condition "Delivery method does not contain Express" → Postage Type: `PARCELPOST`
### Conditional Actions
Create multiple workflows for different scenarios:
* **Workflow 1**: Standard orders → Postage Type: `PARCELPOST`
* **Workflow 2**: Express orders → Postage Type: `EXPRESSPOST`
* **Workflow 3**: High-value orders → Postage Type: `EXPRESSPOST`
* **Workflow 4**: Specific packages → Postage Type: `PARCELPOST` with Package Name: "Large Box"
Each workflow handles different order types automatically. Remember to use the exact field names:
* **Fulfillment Order ID**: Always use `{{ fulfillmentOrder.id }}`
* **Postage Type**: Must be `PARCELPOST` or `EXPRESSPOST` (uppercase)
* **Package Name**: Optional, leave empty to use default package from app settings. **Important:** If specified, must match exactly as configured in your app settings (case-sensitive)
## Limitations and Considerations
### Plan Requirements
* You must be on a paid plan for {appName} to use Shopify Flow actions
* Starter plan users must upgrade to a paid plan to use Flow actions
* Consider the cost-benefit of upgrading vs. manual processing
### Order Processing
* Flow actions run when fulfillment orders are ready, which may be after payment processing
* Some orders might need manual review (fraud checks, special instructions, etc.)
* Consider excluding certain order types from automation
### Error Handling
* If label generation fails, the order won't be automatically fulfilled
* Monitor failed label generations and address issues promptly
* Set up notifications for workflow failures
## Next Steps
Now that you understand Shopify Flow automation, explore these related features:
Automate package selection and shipping options based on order conditions.
Process multiple orders manually when needed for special cases.
Learn about all features and advanced configuration options.
Get up and running quickly with basic setup instructions.
**Need help setting up your Flow?** Contact our support team or book a free consultation to get expert guidance on automating your fulfillment process.