> ## Documentation Index
> Fetch the complete documentation index at: https://help.kivaro.io/llms.txt
> Use this file to discover all available pages before exploring further.
# Quickstart
> Get up and running with AusPost MyPost Business in minutes
export const calendlyUrl = "https://calendly.com/kivaro-support/30min";
export const supportEmail = "support@kivaro.io";
export const companyName = "Kivaro";
export const auspostPartnersUrl = "https://auspost.com.au/mypost-business/account-management/partners";
export const shopifyAppStoreUrl = "https://apps.shopify.com/auspost-mypost-business";
export const appName = "AusPost MyPost Business";
## Get started in three steps
Set up {appName} integration and create your first shipping label in just a few minutes.
### Step 1: Install and connect your account
Add {appName} to your Shopify store from the Shopify App Store.
1. Search for "{appName}" in the App Store
2. Click **Install** and follow the installation prompts
3. Grant the required permissions for orders, products, and fulfillment data
The app needs access to your order data to generate accurate shipping
labels.
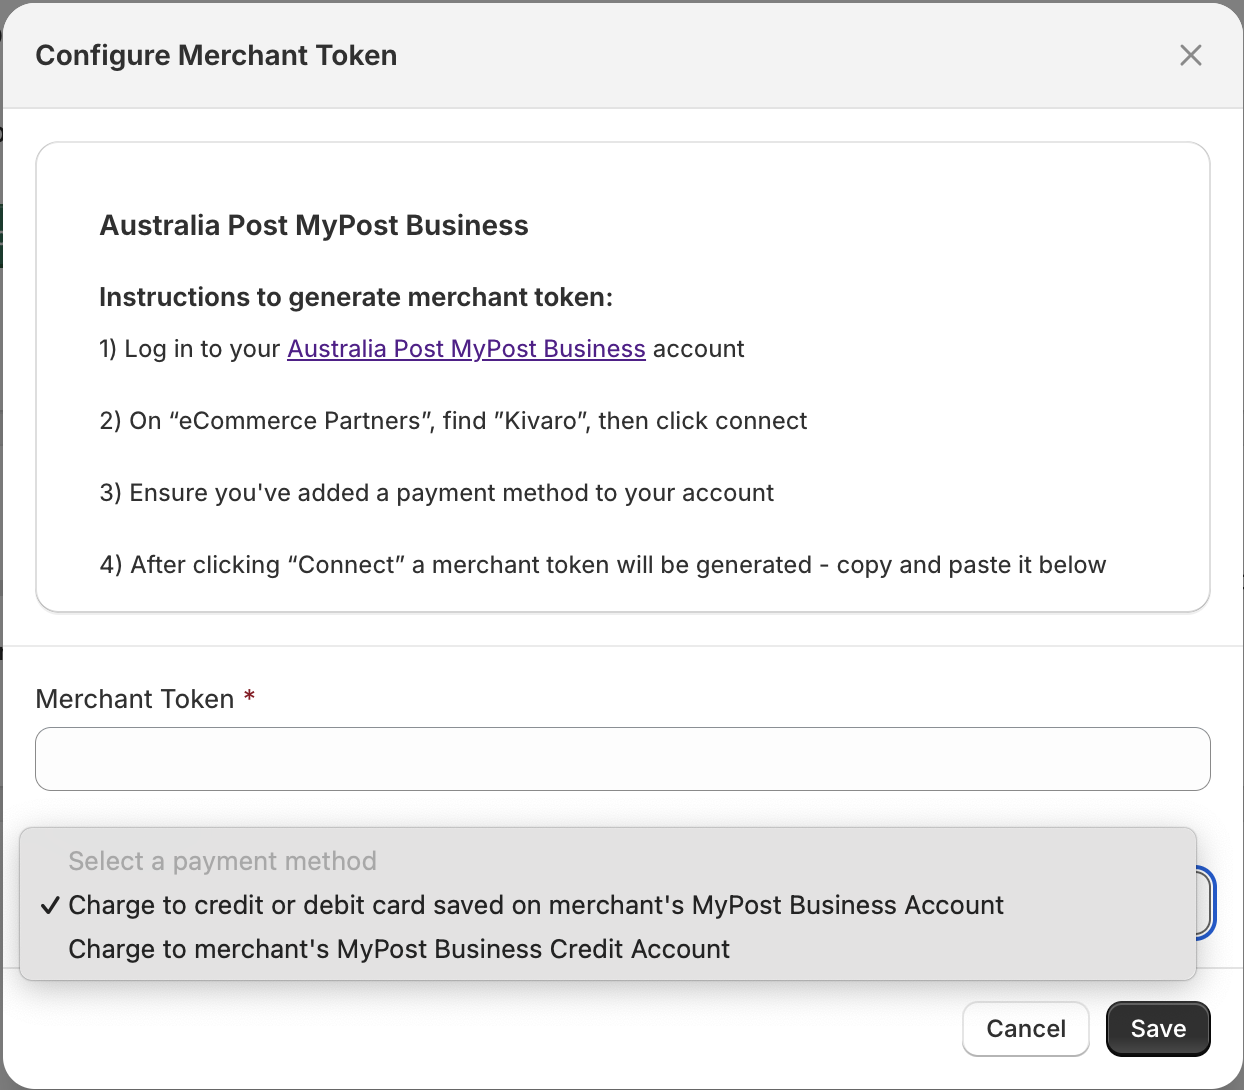
Link your existing Australia Post MyPost Business account to start creating labels.
1. Log in to your Australia Post MyPost Business account
2. Navigate to "eCommerce Partners" and find "{companyName}"
 3. Click **Connect** and copy the generated merchant token
 4. Paste the token in the app and select your payment method
 Ensure you have a valid payment method added to your Australia Post
account before connecting.
### Step 2: Configure your settings
Configure your shipping preferences to streamline the label creation process.
1. Choose your default print layout (A4 or A6)
2. Select preferred shipping services (Parcel Post, Express Post)
3. Set up signature and transit cover options
4. Configure package preferences (flat-rate or custom)
You can always override these defaults when creating individual labels.
**Important:** Ensure your fulfillment location address (from address) is correctly configured with accurate state, postcode, and street address. This address is used for shipping rate calculations and label generation. Verify your inventory location settings in Shopify match your actual fulfillment address.
Set up custom packages for your specific shipping needs.
1. Go to **Settings** in the app
2. Click **Add Package** under Custom Packaging
3. Define dimensions, weight, and package type
4. Set as default for automatic selection
Custom packages help optimize shipping costs and ensure proper fit for your products.
### Step 3: Create your first label
Now you're ready to create your first shipping label!
1. Navigate to any unfulfilled order in your Shopify admin
2. Click **Create shipping label** in the order details
3. Review package details and adjust if needed
4. Select shipping service and any additional options
5. Click **Buy shipping label** to generate and download
**Address verification required:** Before generating labels, ensure both addresses are complete and accurate:
* **From address (inventory location):** Verify your fulfillment location has correct state, postcode, street address, and city. This is critical for accurate shipping rate calculations.
* **Delivery address (customer address):** Ensure customer orders have complete delivery addresses including state, postcode, and street address. Incomplete addresses will prevent shipping rates from being calculated.
You can update your fulfillment location address in Shopify settings or change it from the app settings page if needed.
Labels are automatically applied to orders and tracking information is sent to customers.
For seamless integration, use the "Create Shipping Labels" admin action:
**From Orders Listing Page:**
1. Select one or more orders
2. Click **More actions** → **Create Shipping Labels**
**From Order Details Page:**
1. Click **More actions** → **Create Shipping Labels**
This sends orders directly to the Kivaro MyPost Business App for streamlined label creation and order fulfillment.
The admin action keeps you in your Shopify admin while accessing all shipping functionality.
## Next steps
Now that you're set up, explore these powerful features to streamline your shipping:
Automate package selection and shipping options based on order conditions.
Automatically generate shipping labels when orders are ready to fulfill.
Create shipping labels for multiple orders simultaneously.
Divide orders into multiple shipments when items need separate fulfillment.
Generate professional packing slips for your orders to include with shipments.
Handle customs declarations and export documentation for global orders.
Monitor all shipments with real-time tracking updates (Paid plans only).
Comprehensive guide covering all features, advanced configuration, and
troubleshooting.
**Need help?** Contact our support team or book
a free consultation to get expert guidance.
Ensure you have a valid payment method added to your Australia Post
account before connecting.
### Step 2: Configure your settings
Configure your shipping preferences to streamline the label creation process.
1. Choose your default print layout (A4 or A6)
2. Select preferred shipping services (Parcel Post, Express Post)
3. Set up signature and transit cover options
4. Configure package preferences (flat-rate or custom)
You can always override these defaults when creating individual labels.
**Important:** Ensure your fulfillment location address (from address) is correctly configured with accurate state, postcode, and street address. This address is used for shipping rate calculations and label generation. Verify your inventory location settings in Shopify match your actual fulfillment address.
Set up custom packages for your specific shipping needs.
1. Go to **Settings** in the app
2. Click **Add Package** under Custom Packaging
3. Define dimensions, weight, and package type
4. Set as default for automatic selection
Custom packages help optimize shipping costs and ensure proper fit for your products.
### Step 3: Create your first label
Now you're ready to create your first shipping label!
1. Navigate to any unfulfilled order in your Shopify admin
2. Click **Create shipping label** in the order details
3. Review package details and adjust if needed
4. Select shipping service and any additional options
5. Click **Buy shipping label** to generate and download
**Address verification required:** Before generating labels, ensure both addresses are complete and accurate:
* **From address (inventory location):** Verify your fulfillment location has correct state, postcode, street address, and city. This is critical for accurate shipping rate calculations.
* **Delivery address (customer address):** Ensure customer orders have complete delivery addresses including state, postcode, and street address. Incomplete addresses will prevent shipping rates from being calculated.
You can update your fulfillment location address in Shopify settings or change it from the app settings page if needed.
Labels are automatically applied to orders and tracking information is sent to customers.
For seamless integration, use the "Create Shipping Labels" admin action:
**From Orders Listing Page:**
1. Select one or more orders
2. Click **More actions** → **Create Shipping Labels**
**From Order Details Page:**
1. Click **More actions** → **Create Shipping Labels**
This sends orders directly to the Kivaro MyPost Business App for streamlined label creation and order fulfillment.
The admin action keeps you in your Shopify admin while accessing all shipping functionality.
## Next steps
Now that you're set up, explore these powerful features to streamline your shipping:
Automate package selection and shipping options based on order conditions.
Automatically generate shipping labels when orders are ready to fulfill.
Create shipping labels for multiple orders simultaneously.
Divide orders into multiple shipments when items need separate fulfillment.
Generate professional packing slips for your orders to include with shipments.
Handle customs declarations and export documentation for global orders.
Monitor all shipments with real-time tracking updates (Paid plans only).
Comprehensive guide covering all features, advanced configuration, and
troubleshooting.
**Need help?** Contact our support team or book
a free consultation to get expert guidance.