> ## Documentation Index
> Fetch the complete documentation index at: https://help.kivaro.io/llms.txt
> Use this file to discover all available pages before exploring further.
# Purchase Label (Adhoc & Another Label)
> Buy a MyPost Business shipping label for replacements, returns, or already fulfilled Shopify orders
export const calendlyUrl = "https://calendly.com/kivaro-support/30min";
export const supportEmail = "support@kivaro.io";
export const appName = "AusPost MyPost Business";
## Overview
The **Purchase label** page lets you buy an Australia Post MyPost Business label **outside the main Ready to ship workflow**.
Use it when you need to:
* Buy **another label** for an order you already fulfilled (replacement, damaged parcel, wrong service)
* Create a **return label** by swapping from/to addresses
* Purchase a **standalone domestic label** that is not linked to a Shopify order
 ## Ways to open Purchase label
### 1. From a Shopify order (recommended for replacements)
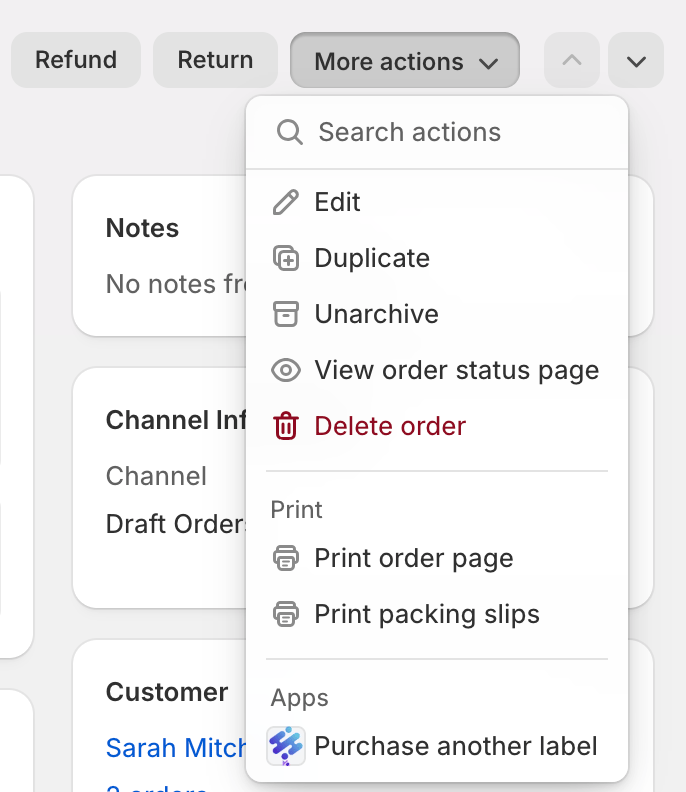
1. Open the order in **Shopify admin → Orders**
2. Click **More actions**
3. Choose **Purchase another label**
Customer and order details are prefilled so you can buy postage and optionally add the new tracking number to that order.
## Ways to open Purchase label
### 1. From a Shopify order (recommended for replacements)
1. Open the order in **Shopify admin → Orders**
2. Click **More actions**
3. Choose **Purchase another label**
Customer and order details are prefilled so you can buy postage and optionally add the new tracking number to that order.
 ### 2. From Transactions
In {appName}, open **Transactions** and choose **Purchase label**.
### 3. Direct app page
Open **Purchase label** from the app navigation / shipping section (`Purchase label` page title in the app).
## What you can configure
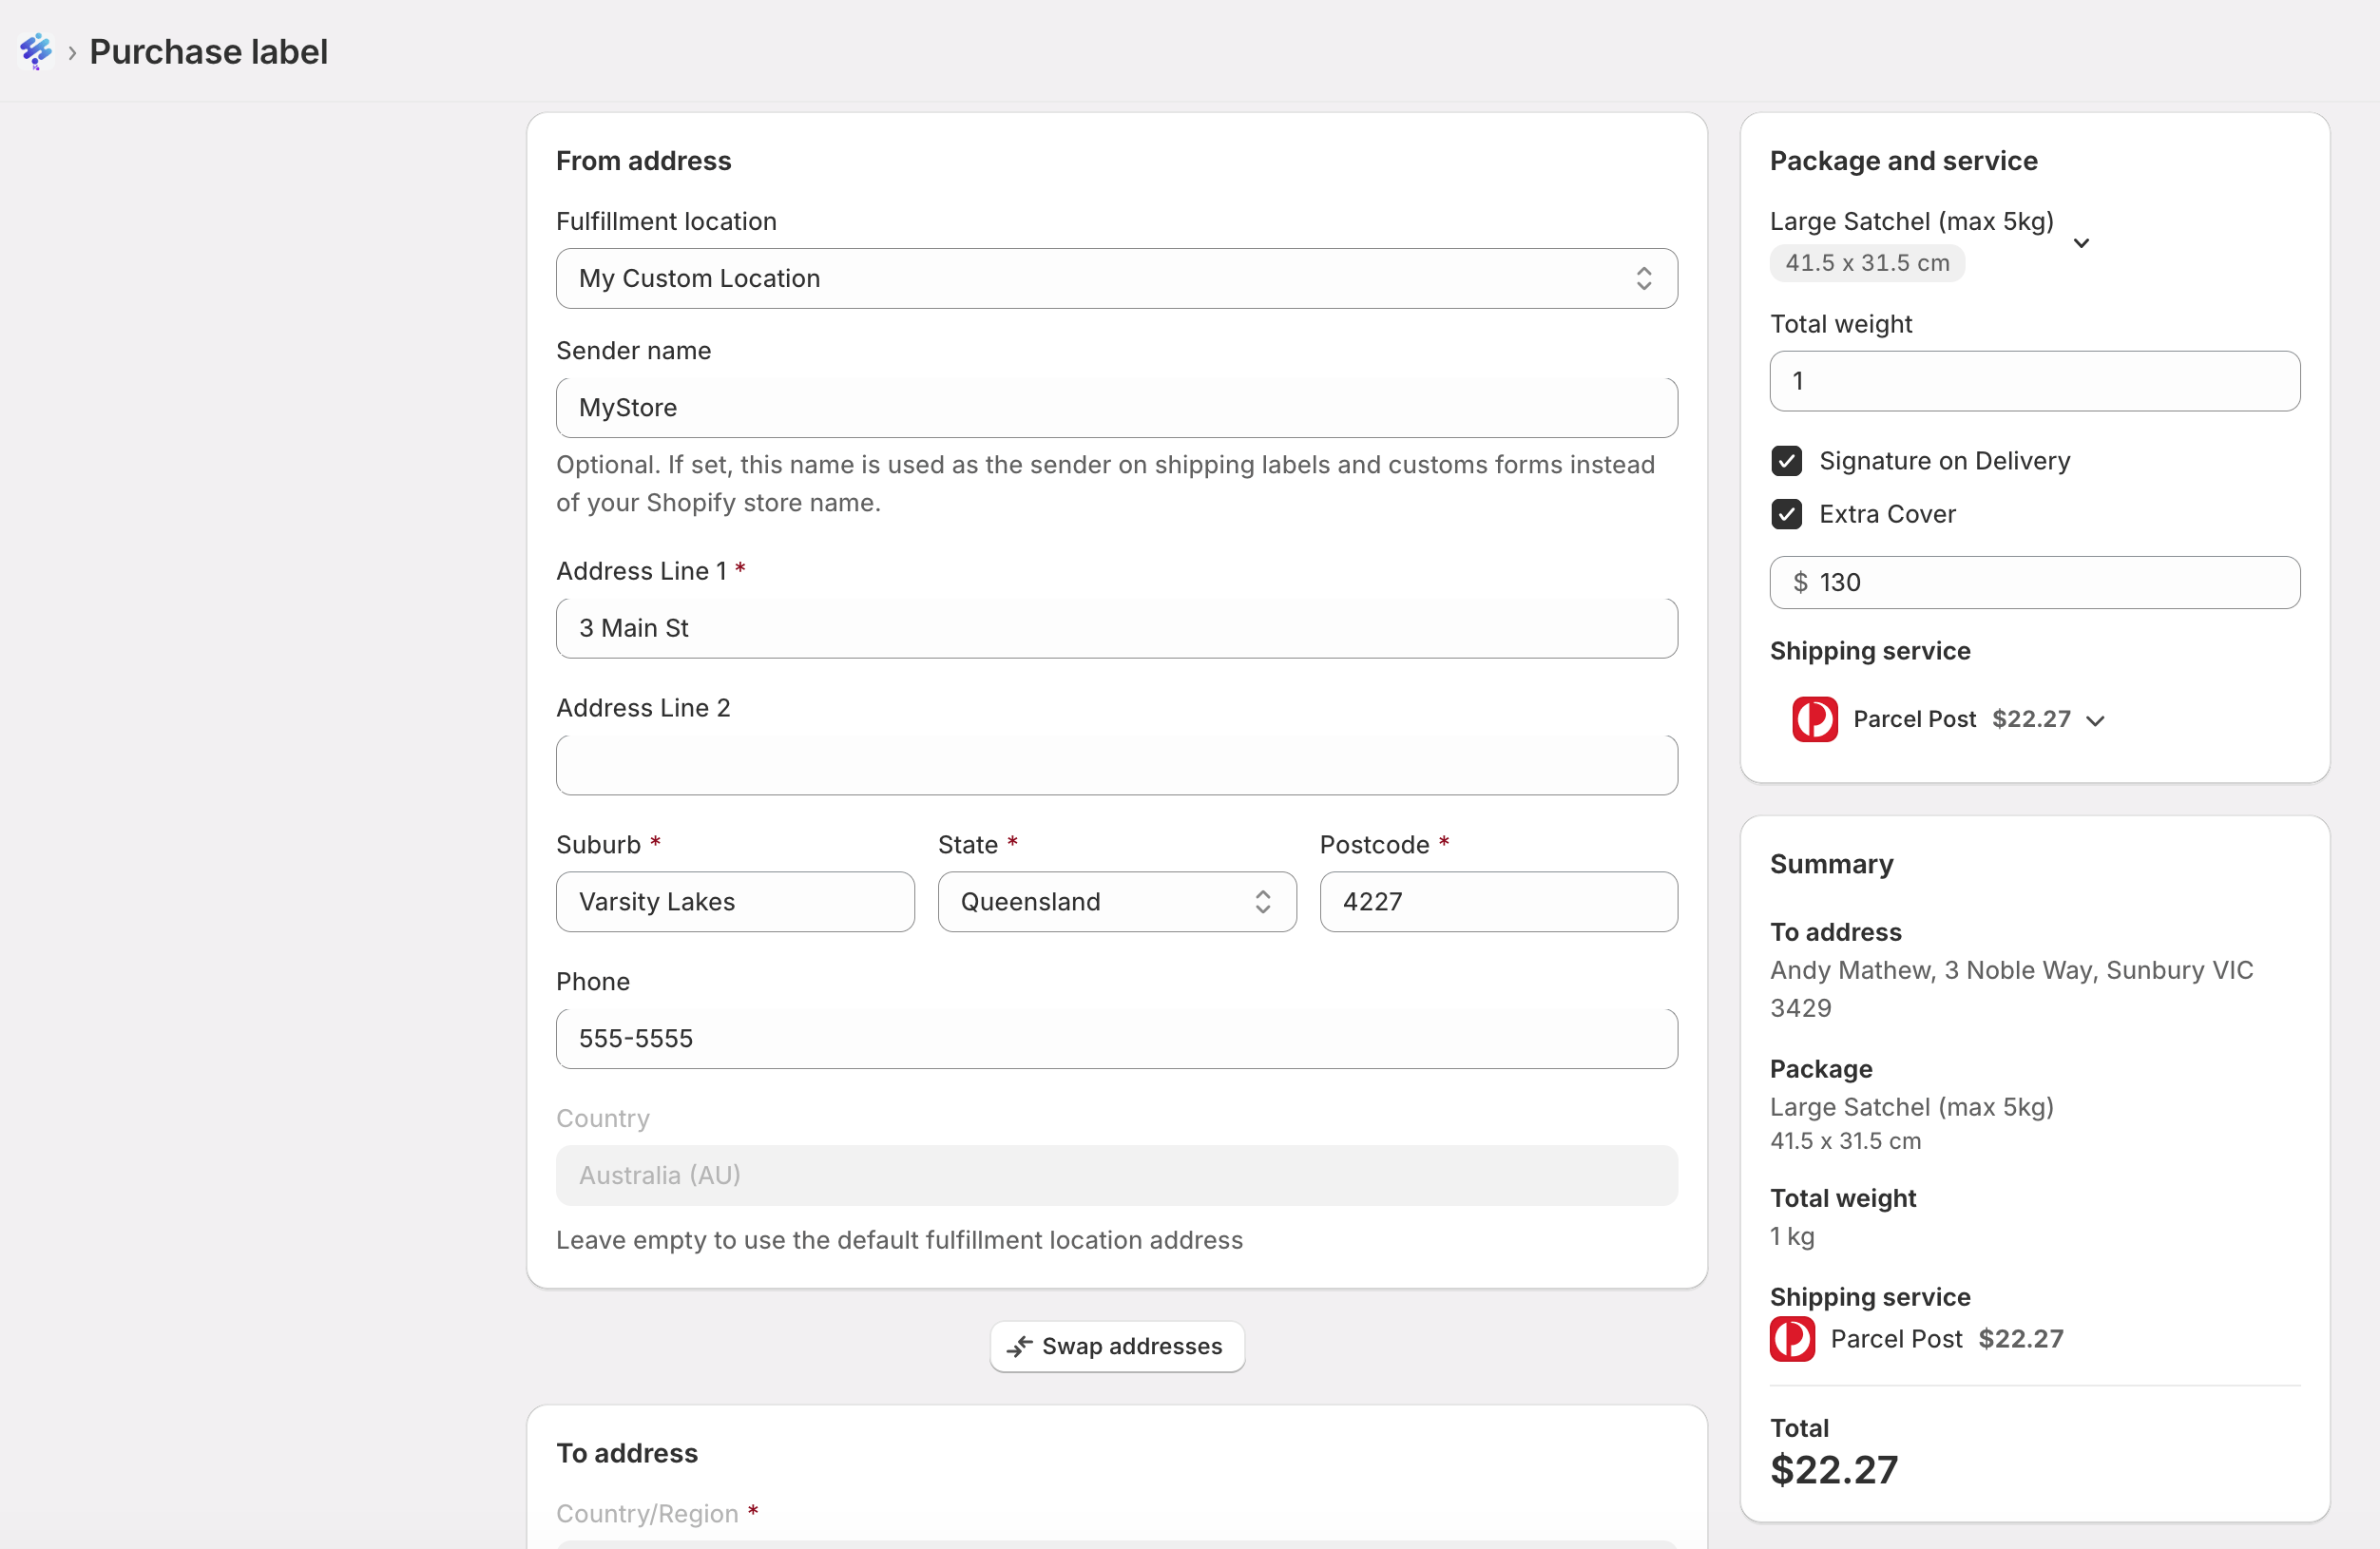
Choose the fulfilment location address your parcel ships from
Enter or edit the delivery address (standalone labels are Australia-only)
Quickly swap from/to for return labels
Pick a package, weight, Parcel Post or Express Post, and extras
Add one-off box sizes or save a custom package for later
When linked to a Shopify order, append the new tracking number
## Buy a label step by step
Start from **More actions → Purchase another label** on an order, or open **Purchase label** in the app.
Check **From** (your location) and **To** (customer). Use **Swap addresses** for returns. Standalone labels must be domestic (Australia).
Select a flat-rate or custom package, enter total weight, and set postage features / transit cover if needed.
In the package picker, choose **Add custom package / one-off dimensions**. Enter length, width, and height in centimetres. Optionally save the size as a reusable custom package.
Wait for the quote, then choose Parcel Post or Express Post (and any other available options).
If the label is linked to a Shopify order, you can tick **Add tracking to Shopify order** and optionally **Send tracking details to customer(s)**. Tracking is added **alongside** any existing tracking — it does not replace it.
Confirm the postage cost and purchase. Download or print the label when it is ready.
## Custom dimensions on Purchase label
Purchase label uses the **same custom dimensions experience** as the main Shipping Labels page:
* Enter **Length**, **Width**, and **Height** in cm
* Apply as a **one-off package** for this label only, or
* **Save as custom package** so it appears in your package list next time
Validation matches MyPost Business rules (for example, dimensions must be valid and within carrier limits). See also [Bulk operations → Set custom dimensions](/bulk-operations#set-custom-dimensions).
## Linked order vs standalone
| | Linked to Shopify order | Standalone |
| --------------------------- | ----------------------------------------------- | ---------------------------------- |
| How you open it | Order **More actions → Purchase another label** | Transactions / Purchase label page |
| Address prefills | Yes | You enter them |
| Add tracking to Shopify | Optional | Not available |
| Customer email notification | Optional when adding tracking | Not via Shopify order |
| Destination | Follows the order | Domestic Australia only |
## Common use cases
Open the original order → **Purchase another label** → buy a new service/package → add tracking to the same order so the customer sees the replacement consignment.
Open Purchase label, set the customer address as **From** (or use swap), and your warehouse as **To**, then buy the return postage.
Useful when you need to send an extra item after the original fulfilment was already marked complete in Shopify.
Send a sample, warranty part, or marketplace parcel that is not tied to a Shopify order using a standalone domestic label.
## Tips
* Prefer **Purchase another label** from the order admin when you need tracking to stay attached to that order history.
* Recipient needs a **phone number or email** for MyPost Business validation.
* If postage succeeds but Shopify tracking update fails, the label is still purchased — you can add tracking manually or retry from support guidance.
* Re-download labels from **Transactions** for up to **30 days** after purchase.
## Troubleshooting
International adhoc labels are not supported on this page. Use the main Shipping Labels / international workflow for overseas orders.
Postage was charged successfully. Open the Shopify order and add the tracking number manually if needed, or contact {supportEmail}.
Complete from/to address, package, and weight first. Fix any validation messages under those fields, then wait for the service quote.
Refund unused labels in MyPost Business Transactions. The app cannot cancel MyPost postage via API. See [Advanced features](/advanced-features#troubleshooting).
## Related guides
* [Fulfill later & Labels purchased](/fulfill-later) — buy labels in the main workflow without fulfilling yet
* [Ship together](/combine-shipments) — one label for multiple orders to the same address
* [Bulk operations](/bulk-operations) — custom dimensions and bulk label buying
* [Split shipments](/split-shipments) — split one order into multiple fulfilment orders
## Need Help?
Schedule a one-on-one session with our shipping experts
Get help with Purchase label, replacements, or returns
### 2. From Transactions
In {appName}, open **Transactions** and choose **Purchase label**.
### 3. Direct app page
Open **Purchase label** from the app navigation / shipping section (`Purchase label` page title in the app).
## What you can configure
Choose the fulfilment location address your parcel ships from
Enter or edit the delivery address (standalone labels are Australia-only)
Quickly swap from/to for return labels
Pick a package, weight, Parcel Post or Express Post, and extras
Add one-off box sizes or save a custom package for later
When linked to a Shopify order, append the new tracking number
## Buy a label step by step
Start from **More actions → Purchase another label** on an order, or open **Purchase label** in the app.
Check **From** (your location) and **To** (customer). Use **Swap addresses** for returns. Standalone labels must be domestic (Australia).
Select a flat-rate or custom package, enter total weight, and set postage features / transit cover if needed.
In the package picker, choose **Add custom package / one-off dimensions**. Enter length, width, and height in centimetres. Optionally save the size as a reusable custom package.
Wait for the quote, then choose Parcel Post or Express Post (and any other available options).
If the label is linked to a Shopify order, you can tick **Add tracking to Shopify order** and optionally **Send tracking details to customer(s)**. Tracking is added **alongside** any existing tracking — it does not replace it.
Confirm the postage cost and purchase. Download or print the label when it is ready.
## Custom dimensions on Purchase label
Purchase label uses the **same custom dimensions experience** as the main Shipping Labels page:
* Enter **Length**, **Width**, and **Height** in cm
* Apply as a **one-off package** for this label only, or
* **Save as custom package** so it appears in your package list next time
Validation matches MyPost Business rules (for example, dimensions must be valid and within carrier limits). See also [Bulk operations → Set custom dimensions](/bulk-operations#set-custom-dimensions).
## Linked order vs standalone
| | Linked to Shopify order | Standalone |
| --------------------------- | ----------------------------------------------- | ---------------------------------- |
| How you open it | Order **More actions → Purchase another label** | Transactions / Purchase label page |
| Address prefills | Yes | You enter them |
| Add tracking to Shopify | Optional | Not available |
| Customer email notification | Optional when adding tracking | Not via Shopify order |
| Destination | Follows the order | Domestic Australia only |
## Common use cases
Open the original order → **Purchase another label** → buy a new service/package → add tracking to the same order so the customer sees the replacement consignment.
Open Purchase label, set the customer address as **From** (or use swap), and your warehouse as **To**, then buy the return postage.
Useful when you need to send an extra item after the original fulfilment was already marked complete in Shopify.
Send a sample, warranty part, or marketplace parcel that is not tied to a Shopify order using a standalone domestic label.
## Tips
* Prefer **Purchase another label** from the order admin when you need tracking to stay attached to that order history.
* Recipient needs a **phone number or email** for MyPost Business validation.
* If postage succeeds but Shopify tracking update fails, the label is still purchased — you can add tracking manually or retry from support guidance.
* Re-download labels from **Transactions** for up to **30 days** after purchase.
## Troubleshooting
International adhoc labels are not supported on this page. Use the main Shipping Labels / international workflow for overseas orders.
Postage was charged successfully. Open the Shopify order and add the tracking number manually if needed, or contact {supportEmail}.
Complete from/to address, package, and weight first. Fix any validation messages under those fields, then wait for the service quote.
Refund unused labels in MyPost Business Transactions. The app cannot cancel MyPost postage via API. See [Advanced features](/advanced-features#troubleshooting).
## Related guides
* [Fulfill later & Labels purchased](/fulfill-later) — buy labels in the main workflow without fulfilling yet
* [Ship together](/combine-shipments) — one label for multiple orders to the same address
* [Bulk operations](/bulk-operations) — custom dimensions and bulk label buying
* [Split shipments](/split-shipments) — split one order into multiple fulfilment orders
## Need Help?
Schedule a one-on-one session with our shipping experts
Get help with Purchase label, replacements, or returns